Tuesday, 6 November 2012

Samsung Galaxy SIII Root လုပ္အျမစ္တူးနည္း။

Unknown | 6.11.12 | | Best Blogger Tips

Samsung Galaxy SIII Root လုပ္နည္းတင္ေပးလိုက္ပါတယ္..


 Root မလုပ္ခင္ လုိအပ္မည့္  Galaxy SIII ရဲ ့ Driver . Odin V.3.04 .. CF-Root-SGS3-v6.3.tarတုိ ့ကုိ ေအာက္မွာ


Download ယူလုိက္ပါ.Driver ရွိျပီးသားဆုိရင္ေတာ့ မလုိေတာ့ပါဘူး က်န္တဲ ့ ႏွစ္မ်ဳိးကုိသာ Download ယူလုိက္ပါ။


( ၁) Galaxy SIII Driver for Download


( ၂ ) Odin V.3.04 for download


( ၃ ) CF-Root-SGS3-v6.3.tar for download


( ၄ ) Setting >> About Device >> Model number က GT-I9300 ျဖစ္ရမွာျဖစ္ပါတယ္.


        ေသခ်ာရင္ေတာ့ ဖုန္းကိုပိတ္လိုက္ပါ။


( ၅ ) Volume Down + Home + Power ကိုဖိထားပါ။


( ၆ ) Download Mode ထဲေရာက္ဖုိ ့  Warning Message ေပၚလာရင္ Volume Up ကုိႏွိပ္ျပီးသြားပါ။


( ၇ ) Download Mode ထဲေရာက္ျပီးဆုိရင္ ဖုန္းကို Computer နဲ႔ခ်ိတ္လိုက္ပါ။


( ၈ ) Download လုပ္ထားတဲ့ Odin V.3.04 ျဖည္ၿပီး Odin ကိုဖြင့္လိုက္ပါ။


( ၉ ) PDA ကို ႏွိပ္ၿပီး Download လုပ္ထားတဲ့ CF-Root-SGS3-v6.3.tar ကိုေရြး Start ကို ႏွိပ္လုိက္ပါ။
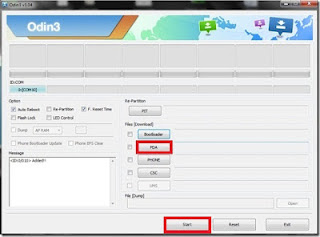


( ၁၀ ) Odin v.3.04 ထဲမွာ PASS ဆိုတဲ့ အစိမ္းေရာင္ေနာက္ခံနဲ႔ စာသားေပၚလာရင္ ဖုန္းရဲ႕ USB ႀကိဳးကိုျဖဳတ္လုိက္ပါ။


( ၁၁ ) ဖုန္း Restart ျပန္တက္လာရင္ေတာ့ CWM Manager နဲ႔ SuperSU တို႔ကုိ Install လုပ္ၿပီးသားေတြ႔ရမွာျဖစ္ပါတယ္။


Resource ====> www.aungkyaw.com


Samsung Galaxy S2 ကုိ Root ေဖာက္လုိက္ရေအာင္…

Unknown | 6.11.12 | | Best Blogger Tips


မေန႕ကအလုပ္ကျပန္လာေတာ့ အသိတစ္ေယာက္က သူ႕ S2 ဖုန္းက Internet ကျမန္မာစာေတြၾကည့္လုိ႕မရဘူးေျပာတယ္။


စမ္းၾကည့္ေတာ့လဲဟုတ္ေနတာပဲ။ Root မလုပ္ပဲနဲ႕ ရုိးရုိးတန္းတန္းျမန္မာစာထည့္ထားတာပဲ။


Samsung 4.0 ေတြမွာဒီလုိအျဖစ္မ်ားပါတယ္။


ဒီေတာ့ Root ေဖာက္လုိက္ရင္ေတာ့ အဆင္ေျပမယ္ဆုိျပီးေဖာက္ေပးလုိက္ပါတယ္။


ကဲဒီေတာ့ Winkabarkyaw ကလူေတြအတြက္တင္ေပးလုိက္ပါတယ္။


လြယ္ပါတယ္…လုပ္ရတာ။ Developer ေတြက User ေတြအတြက္အလြယ္ဆုံးထြင္ေပးထားတာပါ။


ကဲ လုိအပ္တာေလးေတြေဒါင္းလုိက္ရေအာင္ေနာ္…..


S2 Root.zip   (Mediafire)


S2 Root.zip   (DropBox)


Odin v1.85    (Mediafire)


Odin v1.85    (DropBox)


RAR Passwords = phyochan

ေဒါင္းျပီးရင္ေတာ့ Samsung Kies ကုိအရင္ Install လုပ္ပါ။


ျပီးရင္ေတာ့ Odin ကုိ Run လုိက္ပါ။


ဖုန္းကုိ ပါ၀ါပိတ္လုိက္ပါ။


ျပီးရင္ေတာ့ Download Mode ၀င္ရပါမယ္။


Volume Down + Power + Home Key ကုိဖိႏွိပ္လုိက္ပါ။


ျပီးရင္ Volume Up နဲ႕ ဆက္သြားပါ။


Odin မွာ Com: ဆုိျပီးအ၀ါေရာင္ ေလးေပၚလာရင္ ဆက္လုပ္လုိ႕ရပါျပီ။


S2 Root.zip ကုိ  Extract လုပ္လုိက္ရင္ CF-Root-SGS2_XX_XEO_LPQ-v5.3-CWM5.tar ကုိ ေတြ႕ပါလိမ့္မယ္။


ျပီးသြားရင္ ေတာ့ PDA မွာအမွန္ျခစ္ျပီး CF-Root-SGS2_XX_XEO_LPQ-v5.3-CWM5.tar ကုိထည့္ေပးလုိက္ပါ။


Start ကုိႏွိပ္လုိက္ပါ။ PASS: ဆုိျပီး အစိမ္းေရာင္ေလးေပၚလာရင္ ေအာင္ျမင္ပါျပီ။


Reboot က်ျပီးျပန္တက္လာရင္ေတာ့ Super Su ေတြ႕ပါျပီ။


Resource =====>  https://myanmarmobilesoftwaredeveloper.wordpress.com

Edraw Soft Edraw Max 6.5.3.2114 Incl Patch ေလးတင္ေပးလိုက္ပါတယ္။

Unknown | 6.11.12 | | Best Blogger Tips


Command Box မွာ အစ္ကိုတစ္ေယာက္ေတာင္းဆိုထားတာေတြ႕တဲ့အတြက္ Edraw Soft Edraw Max 6.5.3.2114 Incl Patch ေလးတင္ေပးလိုက္ပါတယ္။ က်ေနာ့္ အေနနဲ႕ ေတာ္ေတာ္ေလးကိုရွာၾကံၿပီးတင္ ေပးလိုက္ရတာပါ..ေတာ္ရံုတန္ရံု Website ေတြမွာလဲရွိေတာ့ရွိတယ္.လင့္ခ္ေတြက အေသေတြ.မျပည့္စံု တာေတြျဖစ္ေနပါတယ္.ေနာက္ဆံုးေတာ့ ကိုယ့္ရဲ႕ ျမန္မာဆိုဒ္တစ္ဆိုဒ္ကေန မေမွ်ာ္လင့္ဘဲသြားေတြ႕ပါတယ္...အဲဒီဆိုဒ္ကေနေဒါင္းၿပီး ကိုယ္ပိုင္ Upload Link အျဖစ္ျပန္တင္ေပးလိုက္ပါတယ္ခင္ဗ်ာ။ လိုခ်င္တဲ့သူမ်ား ျမန္ျမန္သာေဒါင္းထားပါ..လင့္ခ္ေတြ အခ်ိန္မေရြး ေသသြားႏိုင္ပါတယ္ခင္ဗ်ာ။


Download Link ==> MediafireMirror

Monday, 5 November 2012

Samsung Galaxy Note 2 N7100 ကို Root ပတ္ခ်င္တယ္ဆိုတဲ့ သူမ်ားအတြက္။

Unknown | 5.11.12 | | Best Blogger Tips

Samsung Galaxy Note 2 N7100 ကို Root ပတ္ခ်င္တယ္ဆိုတဲ့ သူမ်ားအတြက္ Root လုပ္နည္းတင္ေပးလိုက္ပါတယ္။ လြယ္ကူတဲ့အတြက္ ျမန္မာဘာသာကိုျပန္ျပမေနေတာ့ပါဘူးေနာ္။


The Galaxy Note 2 is one mighty beast and people have been restless to have this awesome phone-slash-tablet in their hands. Who wouldn’t when it boasts a quad-core 1.6 GHz processor, an HD Super AMOLED capacitive screen layered with Corning Gorilla Glass 2, and 2 GB of RAM? Talk about power, huh?


And, because this phone has been the talk of the town, custom software for it has been gradually rolling out. If you are looking to get this phone and want to root or flash custom ROMs on it, you came to the right place. Today, we will be showing you how to root your Galaxy Note 2 and flash ClockworkMod Recovery using a toolkit.


XDA Developers member mskip released yet another toolkit. This time, it’s for the Samsung Galaxy Note 2 GT-N7100. With just a few key presses, you can root, install Busybox, install USB drivers, flash insecure boot image, and so much more without going through complex processes. You can also download and flash the latest XXALJ1 stock image that allows for split-screen and multitasking on the Galaxy Note 2.


This guide outlines steps for root and ClockworkMod Recovery for Galaxy Note 2 N7100 using an all-in-one toolkit.


Warning


  • The instructions in this guide are intended for use with the Samsung Galaxy Note 2, model number GT-N7100. Applying these instructions on another device or model may produce undesired outcomes.

  • The information in this guide is provided for instructional and educational purposes only. There is no guarantee that these instructions will work under your specific and unique circumstances.

  • Use these instructions at your own risk. We shall not hold any responsibility or liability for whatever happens to you or your device arising from your use of the info in this guide.

  • Read and understand the whole guide first before actually performing the instructions.


Requirements


  • Samsung Galaxy Note 2 GT-N7100

  • Your phone’s USB cable

  • A Windows PC

  • Download mskip’s Galaxy Note 2 Toolkit V1.0.0 (Galaxy Note2 Toolkit v1.0.0.exe, md5sum: 6ad4ab27d3cb7f9d7883d24f9525a01d)

  • Make sure your phone’s battery is charged to at least 75% to  avoid interruptions during the process.

  • Backup all personal data on your device to make sure you have a copy of your personal data (e.g., contacts, SMS, MMS, Internet settings, Wi-Fi passwords, and the like) in case the procedure in this guide erases such data.


Instructions


Installing the Toolkit


  1. Double-click on the Galaxy Note2 Toolkit v1.0.0.exe file you have just downloaded on your computer to start installing the toolkit.

  2. Keep clicking the Next button until the installation starts.

  3. After installation is done, you can opt to run the program after closing the installation window or you can manually launch the program through its shortcut icon on your Desktop.


Installing Galaxy Note 2 Drivers


Drivers are needed for your phone to be able to communicate with your PC. If you have Samsung Kies installed in your PC, it is better to uninstall it first before proceeding with the following steps.


  1. If your phone is connected to the PC, disconnect the phone. Make sure the phone is in Normal Mode.

  2. Launch the Galaxy Note 2 Toolkit v1.0.0 in your PC.

  3. Select Option 1 in the Toolkit’s window by pressing “1″ on your keyboard to start installing the USB Drivers Pack to your PC.

  4. While installation of the drivers are still going on, enable USB debugging on your phone. To do this, head on to Settings > Developer options > USB debugging. Place a check mark on the box beside the USB debugging option.

  5. Once installation of the drivers is done, connect your phone to the PC using your phone’s USB cable. The PC should be able to detect your phone and install the correct drivers.

    • NOTE: To ensure that the USB drivers have been installed correctly, go to your PC’s Device Manager. With your phone connected to the PC, you should be able to see “Samsung Android Phone” listed as one of the devices with a driver attached to it.


Using the Toolkit


  1. Connect your phone to the PC via USB cable. Make sure your phone is turned on.

  2. Double-click on the Galaxy Note 2 Toolkit icon on your Desktop to launch it.

  3. On the Toolkit’s screen, you’ll be asked to check if there is an available update for the Toolkit. If you want to check for updates, type in “yes” and press Enter. If not, type in “no” and hit the Enter button.

  4. The next screen will then ask you for your phone’s build. To check your phone’s build, head on to your phone’s Settings > About device. Take note of the build.

  5. To select your phone’s build in the Toolkit, key in the number that corresponds to it and press Enter.

  6. After selecting your phone’s build, you’ll be taken to the Toolkit’s main menu.

    • NOTE: If you have installed your drivers correctly, you will see your phone’s serial number under the ADB Mode line. With this, you can start using the Toolkit’s functions.


Rooting and flashing ClockworkMod Recovery


After meeting all the requirements mentioned above, you can use the Toolkit to perform certain functions. You can use the Toolkit to root your phone and flash ClockworkMod Recovery, as described below:


  1. Disconnect your phone from the PC and close the Toolkit if it is still running.

  2. Enable USB Debugging on your phone by heading to Settings > Developer options > USB debugging. Make sure that the check box beside the USB debugging option is ticked.

  3. Launch the Galaxy Note 2 Toolkit on your computer.

  4. On the toolkit’s main menu, select Option 2 (Rooting Options) and press Enter.

  5. The following options for rooting will then be presented:

    1. Flash Insecure Boot Image and Root Phone

    2. Flash Insecure Boot Image, Root + Install Busybox

    3. ALLINONE [Flash Insecure Boot Image, CWM Touch, Root, + Install Busybox]

    4. Flash CWM Touch + Install Root via Recovery [works on ANY build]

    5. Flash Stock Boot Image back to your phone [can do after rooting if desired]

    6. Unroot, Uninstall Busybox + Uninstall CWM Manager via Custom Recovery


  6. Choose the option number of your preference and press Enter.

  7. Follow the instruction and prompts that appear on the screen.


Awesome job! You have successfully rooted your Samsung Galaxy Note 2 GT-N7100 and installed ClockworkMod Recovery using the Galaxy Note 2 Toolkit.


Download Mobile Guide Issue (77)

Unknown | 5.11.12 | Best Blogger Tips


Download Mobile Guide Issue#77


 Ref:https://www.facebook.com/pages/Mobile-Guide-Journal


Windows 8 KMS Activation (05 Nov 2012)

Unknown | 5.11.12 | | Best Blogger Tips


how to activate your Windows 8 Pro/Enterprise. But you should do it as fast as can before it goes down...


or


Microsoft Toolkit 2.4 Beta 5 For Office 10/2013 (Microsoft Office Activate မျဖစ္ေသးရင္ ဒါကိုသံုးပါ)

Unknown | 5.11.12 | Best Blogger Tips


Microsoft Office Activate မျဖစ္ေသးရင္ ဒါကိုသံုးပါ ... သူ႕ကို Run ဖို႔ Microsoft. NET Framework 4.0 or 4.5 လိုပါမယ္ မရွိေသးရင္ ဒီမွာ သြားေရာက္ေဒါင္းယူႏိုင္ပါတယ္ ... Microsoft Office 2010 ကေန Microsoft Office  2013 ထိ Activate လုပ္ေပးႏိုင္တယ္လို႔ဆိုထားပါတယ္ ... Microsoft Office 2013 ကိုေတာ့ စမ္းမၾကည့္ရေသးပါဘူး... စမ္းၾကည့္လို႔ အဆင္ေျပၾကရင္ ေအာက္မွာ Comment ေလးေတြေရးေပးခဲ့ေစခ်င္ပါတယ္.. ေနာက္လူေတြ အဆင္ေျပေစဖို႔ပါ...ေက်းဇူးတင္ပါတယ္...။


Microsoft Toolkit - a set of tools to manage the licensing and
activation of Microsoft Office and Windows.All output from these
functions is displayed in the Information Console. All functions are run
in the background and the GUI is disabled to prevent running multiple
functions, as they could conflict or cause damage if run concurrently.
The Microsoft Office Setup Customization Functions (Customize Setup
Tab), AutoKMS Uninstaller (if AutoKMS is installed),AutoRearm
Uninstaller (if AutoRearm is installed), Office Uninstaller and Product
Key Checker work even if Microsoft Office or Windows is not
installed/supported.


Requirements:

Microsoft. NET Framework 4.0 or 4.5 (Not 3.5)

Microsoft Office 2010/2013 or Later for Office Toolkit Support

Windows Vista or Later for Windows Tookit Support


Credits:

-Bosh for the original GUI Design and co-development of Office Toolkit

-ZWT for the original KMSEmulator

-Letsgoawayhell, Phazor, and nosferati87 for KMSEmulator fixes and improvements

-MasterDisaster, FreeStyler, Daz, nononsense, and janek2012 for work on Key Checker


Changelog:

-Fixed Office Detection issues.

-KMSEmulator doesn't require Visual C++ 2010 x86 Runtimes.

-Removed PIDX Check of Keys entered during License Backup as it fails KMS Host Keys.

-Removed License Refreshing/Caching.

-Will override a custom KMS Host with 127.0.0.1 if KMS Activation fails for that custom KMS Host.


OS: Windows ® XP/Vista/Seven/8

Language: Multilanguage

Year: 2012

Size: 26.3 MB


 Download Here 

(Or)


အင္တာနက္ဂ်ာနယ္ အတြဲ(၁၃)၊ အမွတ္(၄၃)

Unknown | 5.11.12 | Best Blogger Tips


အင္တာနက္ဂ်ာနယ္ အတြဲ ၁၃၊ အမွတ္ ၄၃ ကို ေအာက္ပါ link မွ download ရယူႏိုင္ပါသည္။


  ref:https://www.facebook.com/InternetJournal?ref=stream


Issue Date   IJMain    Mobile    Education    Electronic    TechInside  
 အတြဲ(၁၃)၊အမွတ္(၄၃)  ၅.၁၁.၂၀၁၂  PDF PDF PDF PDF PDF


Wzyo Browser နဲ႔ အျခား Browser ေတြမွာ IDM အလုပ္မလုပ္ရင္

Unknown | 5.11.12 | | Best Blogger Tips


 phyo: Wzyo မွာ IDM latest version က အလုပ္မလုပ္ဘူး အကို ဘယ္ဗားရွင္း က အလုပ္လုပ္ လဲ မသိဘူး ေၿပာၿပေပးပါအံုး ...


Wzyo  Browser  နဲ႔ ေနာက္ထြက္တဲ႔  တျခား Browser ေတြမွာ IDM အလုပ္မလုပ္ရင္ ... ေအာက္က လမ္းေၾကာင္းအတိုင္းျပင္ေပးႏိုင္ပါတယ္...


IDM က Options ကို ႏွိပ္ပါ... 


က်န္တာေတြကို ပံုေလးေတြအတိုင္း တဆင့္ခ်င္းသြားပါ...


အေပၚပံုအတိုင္း C:\Program Files\firefox ကတဆင့္ firefox.exe ဖိုင္လ္ကို Select မွတ္ေပးျပီး Open ကိုႏွိပ္ေပးလိုက္ပါ... (ဒါက က်ေနာ္ Wyzo Browser ကိုမသံုးလို႔ Firefox Browser နဲ႔ နမူနာျပထားတာပါ Wyzo Browser အတြက္ဆိုရင္ C:\Program Files\firefox\wyzo မွ wyzo.exe ဖိုင္လ္ကို Select မွတ္ေပးျပီး Open လုပ္ေပးရမွာပါ...တျခားေသာ Browser အသစ္ ေတြအတြက္ကိုလည္း ဒီနည္းအတိုင္း ျပင္ေပးႏိုင္ပါတယ္..)


Wyzo browser ကို ဒီမွာ ေဒါင္းယူႏိုင္ပါတယ္...။


အဆင္ေျပပါေစ.....


ေနာက္တစ္ခုက IDM နဲ႔ Download လုပ္တဲ႔အခါ တခ်ိဳ႕ဖိုင္လ္အမ်ိဳးအစားေတြကို IDM က မသိတဲ႔အတြက္ ေဒါင္းမေပးပါဘူး... ဥပမာ APK , IPA လိုဖိုင္လ္အမ်ိဳးအစားေတြေပါ့ ... အဲ့ဒီ ဖိုင္လ္ အမ်ိဳးအစားေတြကို IDM နဲ႔ ေဒါင္းေစခ်င္ရင္ ေစာေစာကအတိုင္း IDM > Options ကေန...


File Types ဆိုတဲ႔ Tab မွာ မိမိေဒါင္းေစခ်င္တဲ႔ ဖိုင္လ္အမ်ိဳးအစားကို ေရးထည့္ေပးျပီး OK ႏွိပ္ေပးလိုက္ပါ...။


Cbox မွာေမးထားတဲ႔ Phyo နဲ႔အတူ မသိေသးတဲ႔ သူငယ္ခ်င္းမ်ားအတြက္ ရည္ရြယ္ပါတယ္...။


အားလံုးအဆင္ေျပၾကပါေစ..


ဝင္းကမာၻေက်ာ္


Microsoft Office 2013 Pro RTM Activation (04 Nov 2012)

Unknown | 5.11.12 | Best Blogger Tips


 Microsoft Office 2013 Activate မျဖစ္ေသးတဲ႔ သူငယ္ခ်င္းမ်ားအတြက္ပါ... Key ေတြ Blacklist မျဖစ္ေသးခင္ MS 2013 ကို Activate လုပ္ေပးထားၾကပါ... ေနာက္ Key ေတြ Update ထြက္ရင္ ထပ္တင္ေပးသြားပါ့မယ္...


I found it...well you guys all need to be hurry before key get fully
blacklisted even for the phone activation. Have a lovely Office 2013 :)


Vlc Player ေဇာက္ထိုးျဖစ္ေနရင္

Unknown | 5.11.12 | | | Best Blogger Tips


linko:  Vlc Player နဲ ့Video ၾက ည့္ရင္ေဇာက္ထိုးၾကီးၿဖစ္ေနလို႔ အစ္ကိုသိရင္ေၿဖေပးပါအုံးအကို...


ဟုတ္ကဲ့ ေအာက္မွာ ျပထားတဲ႔ လမ္းေၾကာင္းအတိုင္း ျပင္ေပးလိုက္ပါခင္မ်ာ...


မွ်ားျပထားတဲ႔  Show extended settings ကိုႏွိပ္ပါ...


နံပါတ္ က အမွန္ျခစ္ေလးျဖဳတ္ေပးလိုက္ပါ....


Vlc Player လိုခ်င္ရင္ ဒီမွာ ေဒါင္းယူႏိုင္ပါတယ္...။


အဆင္ေျပပါေစ...


ဝင္းကမာၻေက်ာ္


ေပါ့ေပါ့ပါးပါး အသံုးျပဳရလြယ္တဲ့ TeamViewer ေလးပါ။ (3.77MB)

Unknown | 5.11.12 | Best Blogger Tips


TeamViewer ဆိုတာေလးကိုမသိတဲ့သူေတြအတြက္ မိတ္ဆက္ေပးပါ့မယ္...ဘယ္လိုအသံုးျပဳရလဲဆိုတာ အင္တာနက္ဆက္သြယ္မႈရွိတဲ့ စက္ေတြမွာအသံုးျပဳရမွာပါ..ဘယ္လိုအသံုး၀င္သလဲဆိုရင္ မိမိစက္ကေန

တစ္ဖက္ႏိုင္ငံကစက္ကိုျဖစ္ေစ...တစ္ျခားနယ္က စက္ကိုျဖစ္ေစ လွမ္းထိန္းခ်ဳပ္လို႕ရပါတယ္.. ဘယ္လိုသံုးရမလဲဆိုရင္ မိမိစက္မွာလဲ Teamviewer ကိုဖြင့္လိုက္ပါ..တစ္ဖက္က စက္မွာလဲ Teamviewer ကိုဖြင့္လိုက္ပါ..မိမိက တစ္ဖက္ကြန္ပ်ဴတာကိုလွမ္းၿပီးထိန္းခ်ဳပ္ခ်င္တယ္ဆိုရင္..တစ္ဖက္က ကြန္ပ်ဴတာရဲ႕ ID နဲ႕ Passwords ကိုေတာင္းလိုက္ပါ။ ၿပီးတာနဲ႕ ညာဘက္က Create Session မွာ တစ္ဖက္က ေပးတဲ့ ID Number ကိုထည့္ပါ..Connect to partner ကိုႏွိပ္ပါ။


 ၿပီးတာနဲ႕ Passwords ေတာင္းပါလိမ့္မယ္..Passwords ကိုထည့္ၿပီး Logon ႏွိပ္လိုက္ပါ..စကၠန္႕ပိုင္းအတြင္း တစ္ဖက္က ကြန္ပ်ဴတာကို လွမ္းၿပီး ျပဳျပင္ထိန္းခ်ဳပ္ေပးလို႕ရသြားပါလိမ့္မယ္။ မိမိကြန္ပ်ဴတာထဲက Data ေတြကိုလဲ တစ္ဖက္ကို လွမ္းၿပီး တိုက္ရိုက္ေပးပို႕လို႕ရပါေသးတယ္ခင္ဗ်ာ။


Download Link ===> Mediafire4shared

Sunday, 4 November 2012

Advanced SystemCare Pro 6.0.8.170

Unknown | 4.11.12 | Best Blogger Tips


Advanced SystemCare ကိုေတာ့ အားလံုးသိၾကမွာပါ Update ေလးထြက္လာလို႔ ထပ္တင္ေပးလိုက္ပါတယ္...


Features:

# Scan and remove spyware and adware with the latest definition

# Prevent spyware, hijackers and bad websites from being installed

# Erase the history of all activities in your computer

# Scan and fix invalid and improper registry entries

# Detect and remove invalid startup items

# Search and Clean up unused Windows garbage

# Repair system configurations, Eliminate System Bottlenecks and Prevent Crashes

# Tune up Windows to improve both system and Internet performance, unleash the power of your Windows

# Analyze and Show detailed information of hardware and Windows

# Finish all Work with one click, Super Easy to Use


Yamicsoft Windows 8 Manager 1.0.0 Final

Unknown | 4.11.12 | | Best Blogger Tips


Windows 8 Manager is a system utility that helps you optimize, tweak, repair and clean up Windows 8. It will increase your system speed, eliminate system fault, improve system security, and meet all of your expectations.Windows 8 Manager is a system utility that helps you optimize, tweak, repair and clean up Windows 8. It will increase your system speed, eliminate system fault, improve system security, and meet all of your expectations.


Features and Benefits of Windows 8 Manager
Information:
Get detailed system and all hardware information on your system; help you find out the installation key of Windows, Office products; show all detailed information of running processes and threads on your machine; Windows 8 Manager offers 1-clicking Cleaner cleans your system automatically; Repair Center helps you to fix various system problems.
Optimizer:
Tweak your system to improve windows startup and shutdown speed, tweak your hardware to increase system speed and performance; Control what is started on Windows startup, check and repair the advanced starup items to restore the malicious change by viruses; Tune up and optimize system services and Task Schedule, turn off smartly some unnecessary system services and tasks to improve system performance.
Cleaner:
Find out which files or folders engross your disk space and shown with chart; Smart Uninstaller can fully delete programs from your system without residual files and Registry entries; Find and clean junk files to increase Hard Disk space; Duplicate Files Finder can scan your computer for files with the same size, name and modification time; Registry Cleaner checks and repair incorrectly linked Registry entries; Registry Defrag rebuilds and re-indexes your Registry to reduce registry access time and therefore improve application responsiveness; Desktop Cleaner can clean useless icons and files on Desktop easily.
Customization:
Customize the look of your system by tweaking system Explorer, Desktop, Start Menu, Taskbar and notification area; Create the quick startup items on Taskbar with the Jump List launcher; Tune up Windows 7 boot menu; edit context menus of mouse Right-Clicking; Create the shortcut that executed quick on run dialog box. Visual Customizer can change system and file type icons, custom the logon background.
Security:
Improve system security by tweaking system components, UAC and login settings; Tune up System Restore options; Hide and restrict to access drives and programs; Encrypt/decrypt files, move system folders to safe locations; Undelete the files that accidentally deleted or formatted on disk; Privacy Protector can maintain your personal privacy by eliminating the tracks that you leave behind; Hide, add or delete the Control Panel entries.
Network:
Optimize your Internet connection speed, manage all shares items; Tweak your Internet Explorer easily; IP Switcher can switch your IP address easily on different networks; Edits the Hosts file to speed up surfing internet and permit only to access the specified Hosts.
Misc. Utilities:
Show the collection of Windows utilities; split and merge any files; Automatically back up files regularly using Super Copy. Registry Tools help you to operate Registry easily.

Download Link ====> Mediafire4shared ၊ DirrectMirroLink


Digital Life Journal (05.Nov.2012) အတြဲ-၁၊ အမွတ္ - ၂၇

Unknown | 4.11.12 | Best Blogger Tips


အတြဲ-၁၊ အမွတ္ - ၂၇ Digital Life Journal (05.Nov.2012)
==============================
====
အပတ္စဥ္ တင္ဆက္ေပးေနက်ျဖစ္ေသာ Digital Life Journal အတြဲ-၁၊ အမွတ္-၂၇ ကို Download ရယူႏိုင္ပါၿပီ။


Ref: https://www.facebook.com/digitallifejournal


Kaspersky All Version keys 4 November 2012

Unknown | 4.11.12 | Best Blogger Tips


4th Nov 2012  ဒီေန႔ထြက္တဲ႔  Key  ေတြပါ..ေတာင္းထားလို႔ ျပန္လည္ မွ်ေဝေပးလိုက္ပါတယ္...။


Kaspersky All Version keys 4 November 2012


Here is 100% valid and working Kaspersky KIS KAV All Version keys for your available to download for totally free.


How To Use Guide:
Open Kaspersky 2012 License Manager by clicking ‘Insert your activation code here’ or ‘Manage License’ (from lower right corner).
Click the ‘Activate the application’ button.
Disable your Internet connection (either disable Network adapter from control panel or turn off your modem/router).
Select the ‘Activate commercial version’ radio button and enter the activation code as AAAAA-AAAAA-AAAAA-AAAA1. (Delete any trial key first if you want, by clicking the red X next to the license number).
Click Next, you will then get the option to activate kaspersky using a key file.
Browse to the key location on your computer and activate kaspersky using a key file. You can then turn on your Internet connection.
Enjoy It