


အေပၚမွာေပးထားတဲ႔ ေခါင္းစဥ္ ဖတ္ျပီးေတာ့ တကယ္ မထင္လိုက္ပါနဲ႔ေနာ္...ဟီးး Fake ပါ.. သူငယ္ခ်င္းေတြကို စ,ေနာက္ဖို႔သက္သက္ပါ...
ေမးထားလို႔ ေလ့လာျပီး ျပန္လည္မွ်ေဝေပးလိုက္ပါတယ္...။
မိမိတု႔ိရဲ႕ ကြန္ပ်ဴတာမွာ CPU Processor ကို ကိုယ္ေပးခ်င္တဲ႔နာမည္ေပးျပီး သူငယ္ခ်င္းေတြကို စ,ေနာက္လို႔ရပါတယ္...ဥပမာ မိမိစက္က “Intel® Core™ i5 @ 2.00GHz” ဆိုပါစို႔ အဲ့ဒါကို "Intel® Core™ i11 @ 2.60GHz " မ်ိဳးထိ မိမိ စိတ္ၾကိဳက္ေျပာင္းႏိုင္ပါတယ္ ... Registry ထဲမွာ ဝင္ျပင္ေပးရမွာမို႔ အမွားမခံပါဘူး.. အဲ့ဒါေၾကာင့္ ေအာက္မွာ နည္းလမ္း (၂) ခုကို မူရင္းအတိုင္းတင္ေပးလိုက္တာပါ.... လုပ္တတ္ၾကမယ္ထင္ပါတယ္ေနာ္....:)
နည္းလမ္း (၁)
Fool Your Friends With Intel® Core™ i11 Processor
So follow the simple steps given below:-
* First open run by using Win+R combination.
* Type “Regedit.exe” (without qoutes) and press OK.

* After Pressing OK, Registry Editor is open and expand the tree in following order.
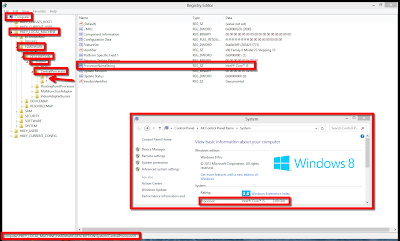
* Computer/HKEY_LOCAL_MACHINE/HARDWARE/DESCRIPTION/System/CentralProcessor/0
* In 0 folder “ProcessorNameString” String there is my default processor name “Intel® Core™ i5” .
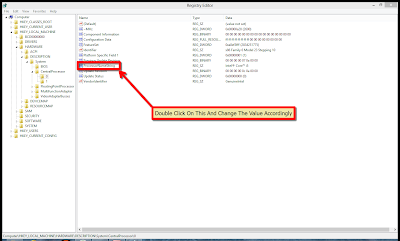
* Now Double Click On “ProcessorNameString” String and change the value data accordingl.
* My default processor name “Intel® Core™ i5”
Processor and I want
to change it to “Intel® Core™ i11” . So, I change the value data to
“Intel® Core™ i11”
And Hit OK
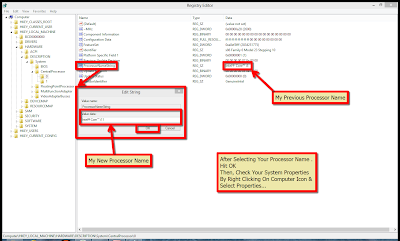
* Now Check your computer properties, By Right clicking on Computer icon and
select properties.
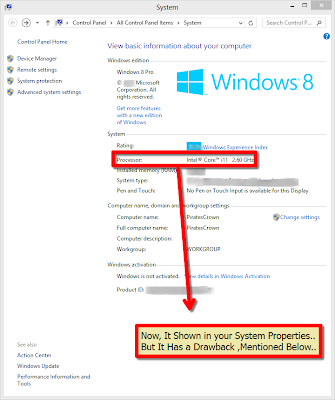
* Now you will see in Processor field the name of desired processor is shown.
Ref: http://www.piratescrown.com
xxxxxxxxxxxxxxxxxxxxxxxxxxxxxxxxxxxxxxxxxxxxxxxxxxxxxxxxxxxxx
နည္းလမ္း (၂)
ဒီ နည္းလမ္းမွာေတာ့ အေပၚနားက service pack 1 ကိုပါ စိတ္ၾကိဳက္ေျပာင္းႏိုင္ပါတယ္...။
Show Fake System Properties in Windows 7
Changing The Processor Name And Its Speed
Step 1: First, you need to open regedit.exe.
Click the Start button type "regedit" and hit Enter.

Picture 1
Step 2: When the registry editor window appears on your screen go to the path given below.
- Computer\HKEY_LOCAL_MACHINE\HARDWARE\DESCRIPTION\System\CentralProcessor\0
Note: If your processor has 2 cores it will appear as 0 and 1.
As shown in Picture 2.

Picture 2
Step 3: Go to the panel on the right side of the registry editor main window and find ProcessorNameString on
the value section then double click it and another window will appear.
This is where you can edit the name of your processor and its speed by
typing a false information that will appear on your system properties.
As shown in Picture 3.

Picture 3
Step 4: After you type your desired name and speed click OK button.
As shown in Picture 4.

Picture 4
Step 5: Click the start button on the right panel of the start menu you can see Computer right click on it and click Properties or click Computer and another window will appear then right click on it then choose Properties. Another window will appear where you can see the difference in your System Properties.
As shown in Picture 5.

Picture 5
_________________________________________________________________
Changing The Service Pack of Your Computer
Step 1: First, you need to open regedit.exe.
Click the Start button type "regedit" and hit Enter.

Picture 1b
Step 2: When the registry editor window appears on your screen go to the path given below.
- Computer\HKEY_LOCAL_MACHINE\SOFTWARE\Microsoft\Windows NT\CurrentVersion
As shown in Picture 2b.

Picture 2b
Step 3: Go to the panel on the right side of the registry editor main window and find CSDVersion
on the value section then double click it and another window will
appear. This is where you can edit your service pack number or you can
put another word or phrase eg. your name, that will appear in the system
properties.

Picture 3b
Step 4: After you type what name or number you want click OK.
As shown in Picture 4b.

Picture 4b
Step 5: Click the start button and LogOff your computer, click your user account then LogIn again. Click the start button on the right panel of the start menu you can see Computer right click on it and click Properties or click Computer and another window will appear then right click on it then choose Properties. Another window will appear where you can see the difference in your System Properties.
Note: This will not take effect unless you log off your computer.

Picture 5b
NOTE:
WHEN YOU RESTART YOUR COMPUTER THE SYSTEM PROPERTIES WILL BACK TO
NORMAL, WINDOWS OS ALWAYS UPDATE THE SYSTEM PROPERTIES EVERY RESTART OR
SIMPLY YOU CAN'T FOOL YOUR SYSTEM, DOING THIS IS JUST FOR FUN TO FOOL
YOUR FRIENDS.
Ref: http://diesmiling.hubpages.com
အားးလံုးး အဆင္ေျပၾကပါေစ...
ဝင္းကမာၻေက်ာ္
www.winkabarkyaw.net


0 comments:
Post a Comment